2024年9月1日にVue3.5がリリースされました。
Vue.jsの作成者Evan You氏は、今回のリリースについて以下のように述べています。
Today we are excited to announce the release of Vue 3.5 "Tengen Toppa Gurren Lagann"!
This minor release contains no breaking changes and includes both internal improvements and useful new features. We will cover some highlights in this blog post - for a full list of changes and new features, please consult the full changelog on GitHub.
引用:The Vue Point


本記事では、Vue3.5の主な新機能の使い方と改善点をまとめてみましたので、それぞれご紹介していきます。
本記事の目次
システムパフォーマンスの最適化
Reactivity System Optimizations
In 3.5, Vue's reactivity system has undergone another major refactor that achieves better performance and significantly improved memory usage (-56%) with no behavior changes. The refactor also resolves stale computed values and memory issues caused by hanging computeds during SSR.
In addition, 3.5 also optimizes reactivity tracking for large, deeply reactive arrays, making such operations up to 10x faster in some cases.
引用:The Vue Point - Reactivity System Optimizations
バージョン3.5では、リアクティブシステムを中心に大幅なシステム改善が行われました。
リアクティブシステムのメモリ使用量の改善
Vue 3.5では、リアクティブシステムが全面的に見直され、メモリ使用量が従来の半分以下(-56%)に削減されるなど、大幅な効率化が実現しました。
他には、computedの古い値が残ってしまう不具合が解消され、より正確なデータ管理が可能になっており、さらにサーバーサイドレンダリング(SSR)中に、computedが原因で発生していたメモリリークの問題も修正されました。
リアクティブな配列に関する高速化の実現
リアクティブな配列に対してのトラッキング操作において、従来よりも最大で10倍の速度向上が実現しました。つまり、リアクティブな配列の追跡処理が効率化され、大規模または複雑でネストの深い配列構造でも高速に動作するようになりました。

Reactive Props Destructureの安定化
Reactive Props Destructure
Reactive Props Destructure has been stabilized in 3.5. With the feature now enabled by default, variables destructured from a
引用:The Vue Point - Reactive Props DestructuredefinePropscall in<script setup>are now reactive. Notably, this feature significantly simplifies declaring props with default values by leveraging JavaScript's native default value syntax:
Reactive Props Destructureは、defineProps で親コンポーネントから子コンポーネントに渡ってきた値を、分割代入された変数を自動的にリアクティブにする機能のことです。
これによりバーション3.5以前では、分割代入された変数はリアクティブ性を失っていましたが、バーション3.5からはリアクティブ性を保持していられるようになりました。

-

-
【Javascript】分割代入とは?配列やオブジェクトから簡単に値を取り出す方法を解説
続きを見る
Reactive Props Destructureの使用例
以下の親コンポーネントファイルと子コンポーネントファイルを用意して、それぞれVueのバージョン3.3、3.4、3.5で表示結果を比較してみます。
<template>
  <input type="number" v-model="num" />
  <ChildComponent :num="num" />
</template>

<script setup lang="ts">
import { ref } from 'vue'
import ChildComponent from '@/components/templates/ChildComponent.vue'

const num = ref<number>(0)
</script>
<template>
<p>count:{{ num }}</p>
<p>double:{{ double }}</p>
<p>triple:{{ triple }}</p>
</template>
<script setup lang="ts">
import { computed } from 'vue'
const { num } = defineProps<{
num: number
}>()
const double = computed(() => num * 2)
const triple = computed(() => num * 3)
</script>バージョン3.3の表示結果
バーション3.3ではエラーが発生し、そもそも表示ができない状態でした。
ERROR
Uncaught ReferenceError: count is not defined
「Uncaught ReferenceError: count は定義されていません。」
バージョン3.4の表示結果
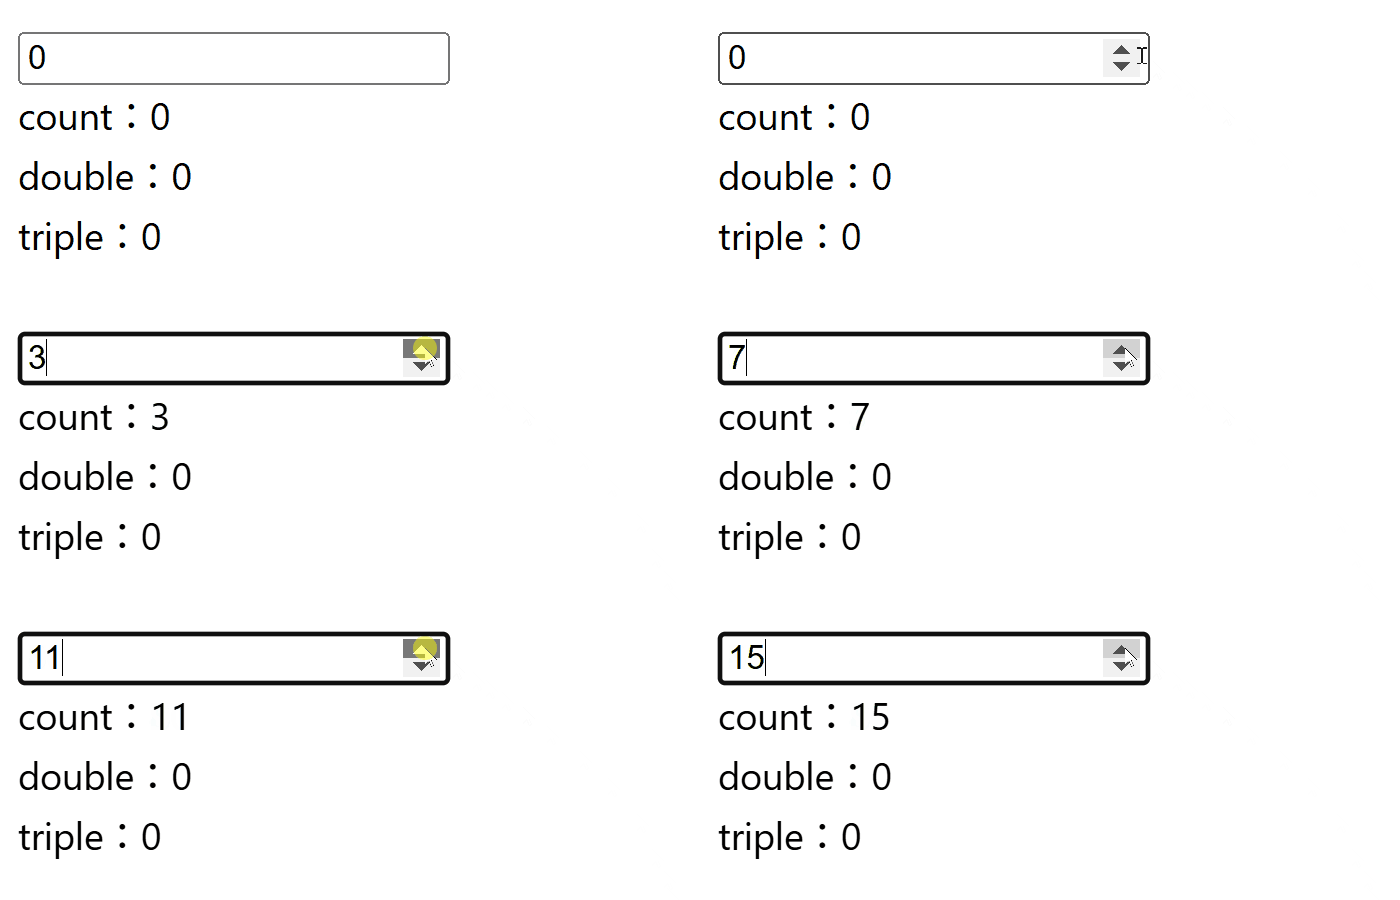
バーション3.4ではdouble、tripleの値がうまく動作しません。
inputの値を変更するとcountは動作しますが、double(countの値を2倍にした値)とtriple(countの値を3倍にした値)がうまく反映されません。
バージョン3.5の表示結果
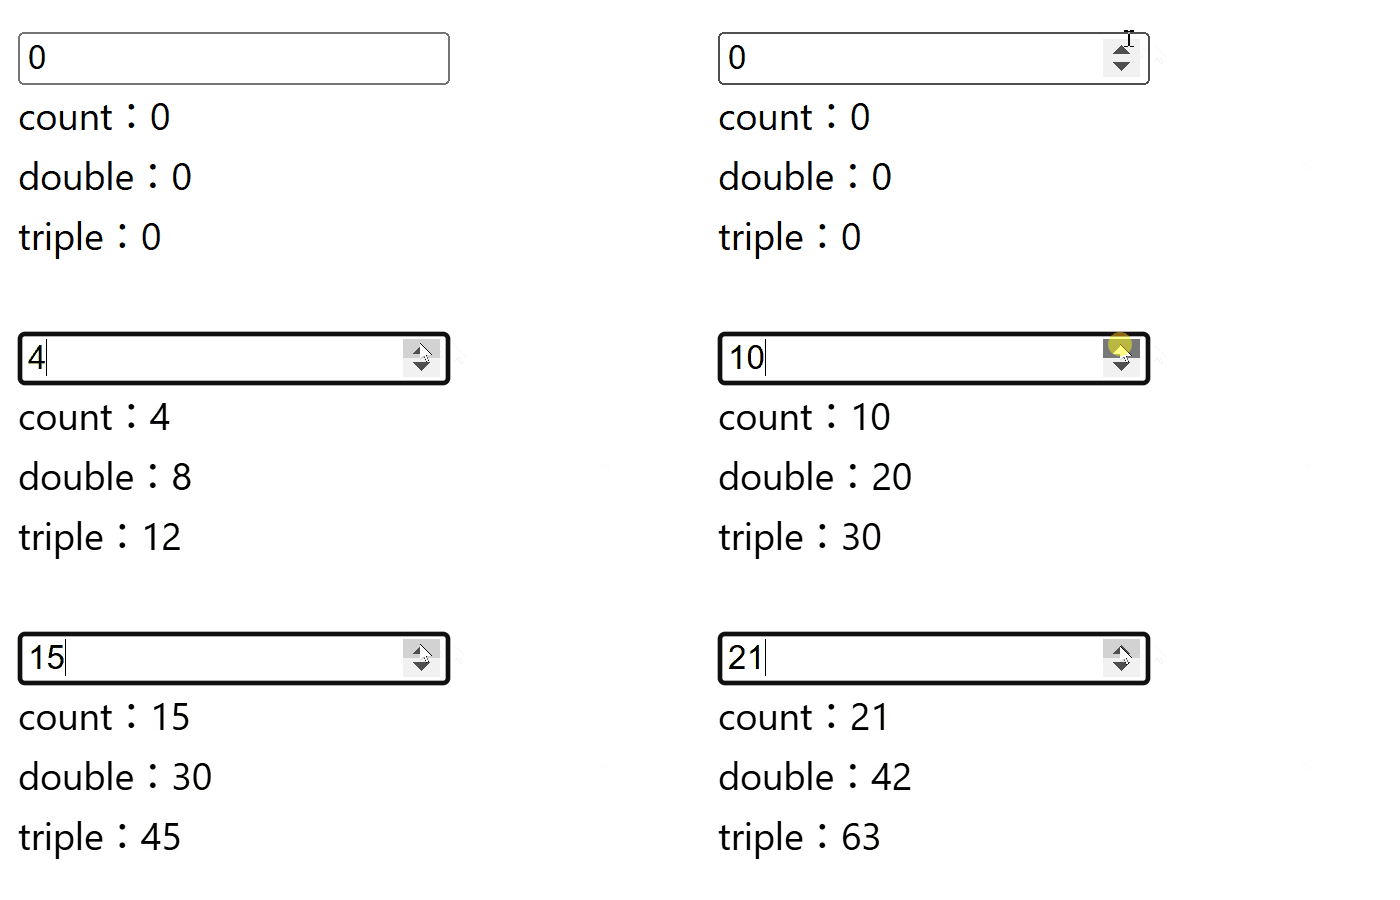
バーション3.5ではinputの値に連動して、doubleとtripleの値が正常に反映されています。
バージョン3.5以前の記述について
バーション3.5以前では、リアクティブ性を保つためにwithDefaults()を使用する必要がありました。
<template>
  <p>count:{{ num }}</p>
  <p>double:{{ double }}</p>
  <p>triple:{{ triple }}</p>
</template>

<script setup lang="ts">
import { computed } from "vue";

const props = withDefaults(
  defineProps<{
    num?: number;
  }>(),
  {
    num: 0,
  }
);
const double = computed(() => props.num * 2);
const triple = computed(() => props.num * 3);
</script>
バージョン3.5以前でもwithDefaults()を使用することで分割代入した値のリアクティブ性を保つことができていましたが、少々コードが冗長になりがちでした。
しかしバージョン3.5からはwithDefaults()の記述が不要になったため、コードが短くなりスッキリさせることができました。
サーバーサイドレンダリング(SSR)の改善
Lazy Hydration
Lazy Hydration
Async components can now control when they should be hydrated by specifying a strategy via the
引用:The Vue Point - Lagy Hydrationhydrateoption of thedefineAsyncComponent()API. For example, to only hydrate a component when it becomes visible:
Lazy Hydrationは、非同期コンポーネントのハイドレート開始のタイミングを制御する機能です。
ハイドレート戦略がいくつかあるためご紹介します。
Hydrate on Idle
hydrateOnIdle()を利用することで、ブラウザがアイドル状態のタイミングでハイドレートを開始させることができます。
hydrateOnIdle()の使用例
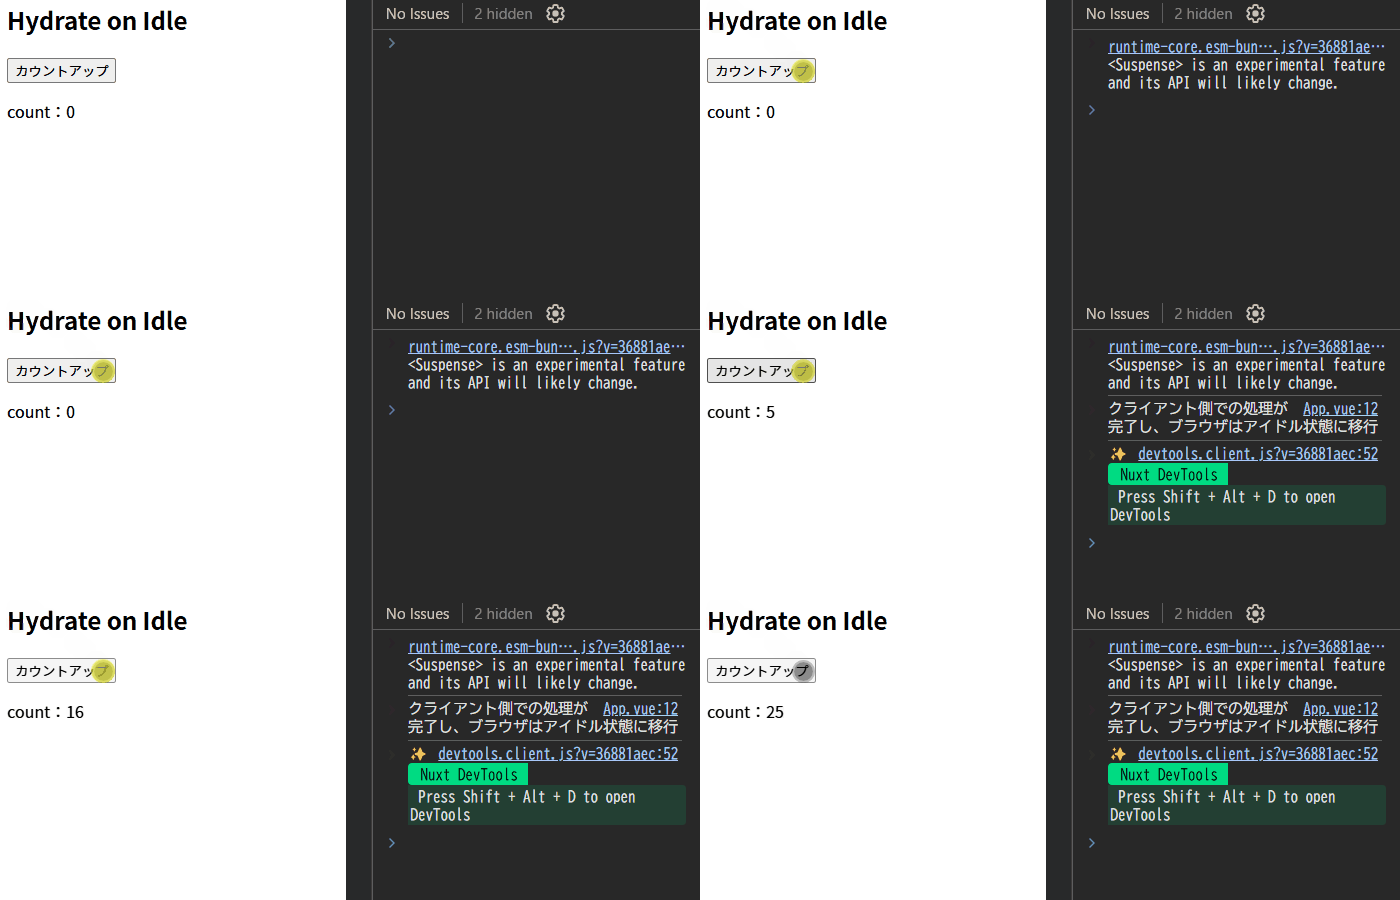
fakeBusy関数を用意して、意図的にクラインアント側の処理を5秒間キープさせています。これによりブラウザのアイドル状態を遅延させてHydrate on Idleを確認します。
<template>
  <h2>Hydrate on Idle</h2>
  <AsyncChildComponent />
</template>

<script setup lang="ts">
import { defineAsyncComponent, hydrateOnIdle, onMounted } from "vue";

const fakeBusy = (duration: number) => {
  const end = Date.now() + duration;
  while (Date.now() < end);
  console.log("クライアント側での処理が完了し、ブラウザはアイドル状態に移行");
};

onMounted(() => {
  fakeBusy(5000);
});

const AsyncChildComponent = defineAsyncComponent({
  loader: () => import("./ChildComponent.vue"),
  hydrate: hydrateOnIdle(),
});
</script>
<template>
<button @click="increment">カウントアップ</button>
<p>count:{{ count }}</p>
</template>
<script setup lang="ts">
import { ref } from "vue";
const count = ref<number>(0);
const increment = () => {
count.value++;
};
</script>表示結果
アイドル状態前はハイドレートが開始されないため、ボタンをクリックしてもcountの値は変更されませんが、アイドル状態となるとhydrateOnIdle()によってハイドレート開始され、非同期コンポーネントがインタラクティブとなり、カウントアップができるようになります。
Hydrate on Visible
hydrateOnVisible()を利用することで、特定の要素がビューポート内に入ったタイミングでハイドレートを開始させることができます。
hydrateOnVisible()の使用例
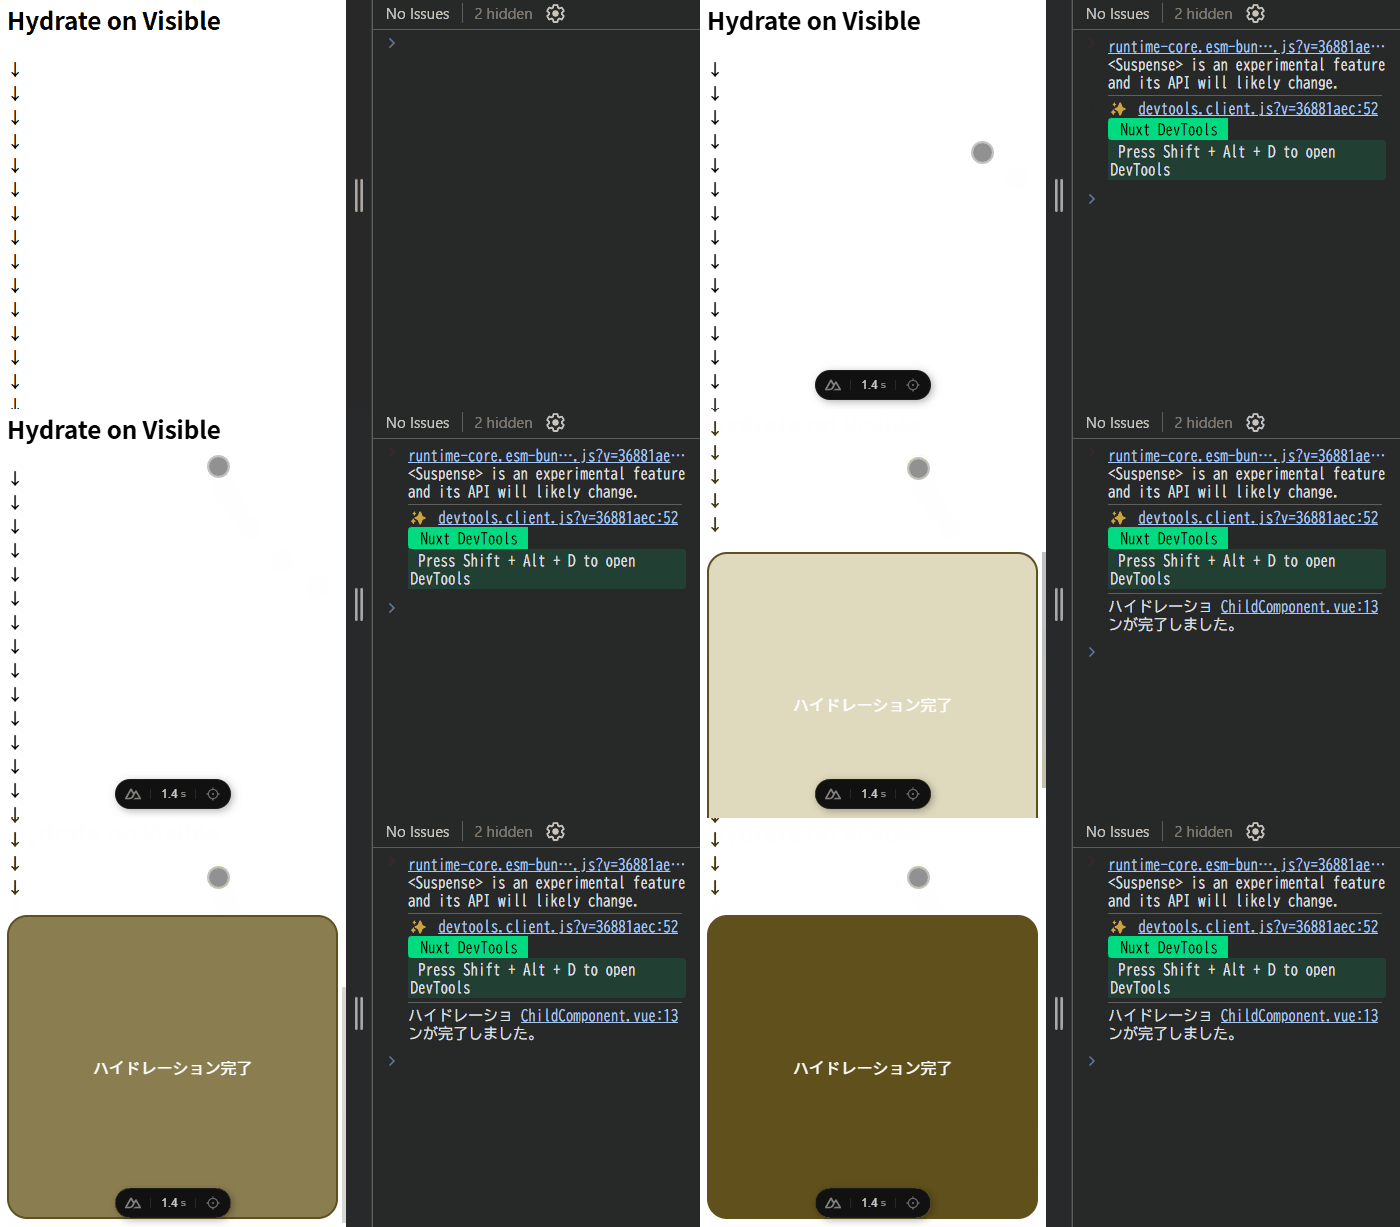
ビューポート外に特定の要素を用意し、スクロールして要素がビューポート内に入ったタイミングで、ハイドレートが開始されるようにしています。
<template>
  <h2>Hydrate on Visible</h2>
  <p>↓<br />↓<br />↓<br />↓<br />↓<br />↓<br />↓<br />↓<br />↓<br />↓<br />↓<br />↓<br />↓<br />↓<br />↓<br /></p>
  <AsyncChildComponent />
</template>

<script setup lang="ts">
import { defineAsyncComponent, hydrateOnVisible } from "vue";

const AsyncChildComponent = defineAsyncComponent({
  loader: () => import("./ChildComponent.vue"),
  hydrate: hydrateOnVisible(),
});
</script>
<template>
<div class="box" :class="{ changeBgColor: hydration}">
<p v-if="hydration">ハイドレーション完了</p>
</div>
</template>
<script setup lang="ts">
import { ref, onMounted } from "vue";
const hydration= ref<boolean>(false);
onMounted(() => {
hydration.value = true;
console.log("ハイドレーションが完了しました。");
});
</script>
<style scoped>
.box {
display: flex;
justify-content: center;
align-items: center;
height: 300px;
background-color: #fffde7;
border: 2px solid #60501b;
border-radius: 20px;
transition: background-color 2s ease-in-out;
}
.box p {
color: #fff;
}
.box.changeBgColor {
background-color: #60501b;
}
</style>表示結果
初期表示時、非同期コンポーネントはビューポート内に表示されていないためハイドレートが開始されませんが、スクロールして非同期コンポーネントがビューポート内に入ると、hydrateOnVisible() によってハイドレートが開始されます。
Hydrate on Media Query
hydrateOnMediaQuery()を利用することで、指定したメディアクエリの条件に一致したタイミングでハイドレートを開始させることができます。
hydrateOnMediaQuery()の使用例
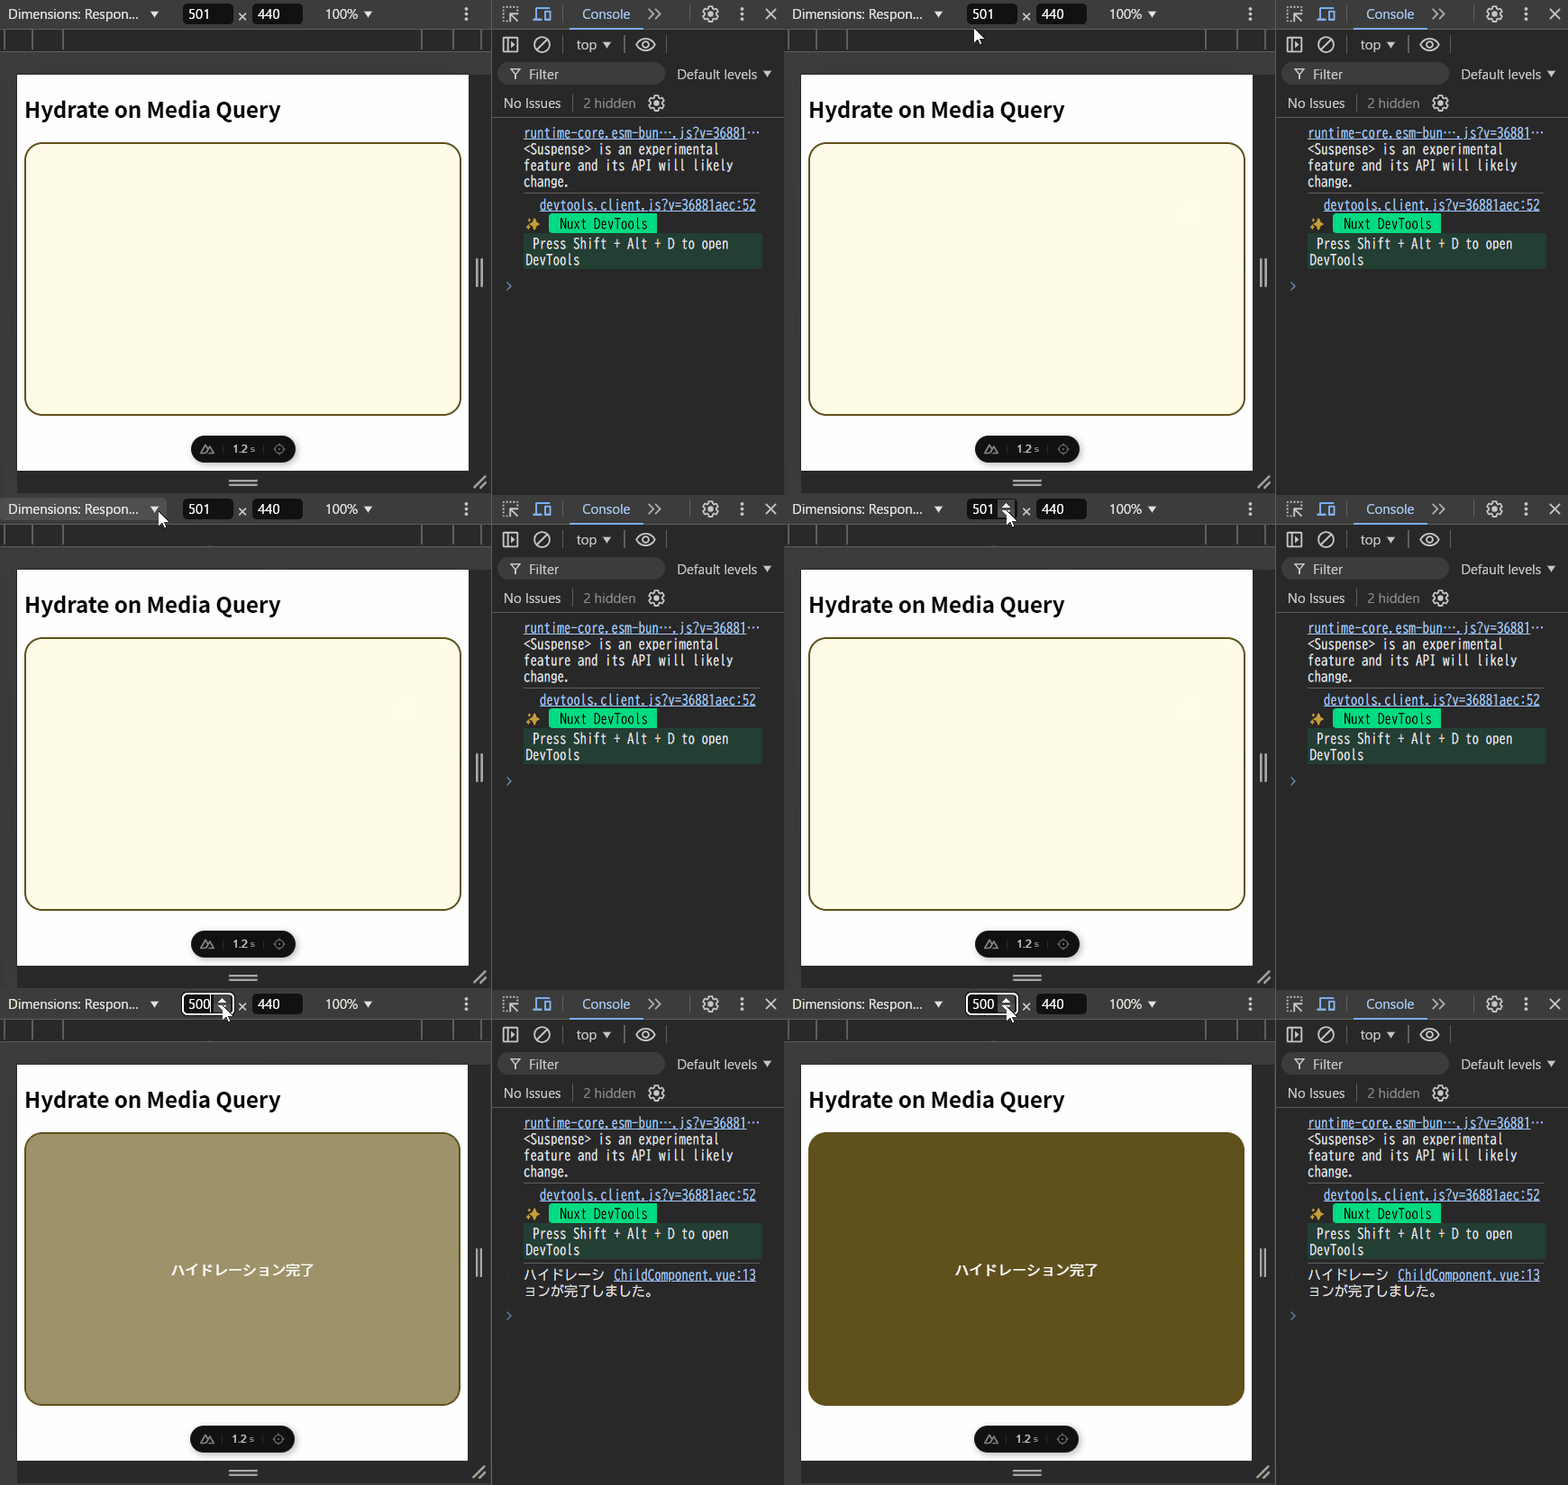
hydrateOnMediaQuery()の引数にメディアクエリの条件を記述します。以下では画面幅が500px以下になればハイドレートを開始するようにしたいので、引数に"(max-width:500px)"と指定しています。
<template>
<h2>Hydrate on Media Query</h2>
<AsyncChildComponent />
</template>
<script setup>
import { defineAsyncComponent, hydrateOnMediaQuery } from "vue";
const AsyncChildComponent = defineAsyncComponent({
loader: () => import("./ChildComponent.vue"),
hydrate: hydrateOnMediaQuery("(max-width:500px)"),
});
</script>
<template>
  <div class="box" :class="{ changeBgColor: hydration}">
    <p v-if="hydration">ハイドレーション完了</p>
  </div>
</template>

<script setup lang="ts">
import { ref, onMounted } from "vue";

const hydration= ref<boolean>(false);
onMounted(() => {
  hydration.value = true;
  console.log("ハイドレーションが完了しました。");
});
</script>

<style scoped>
.box {
  display: flex;
  justify-content: center;
  align-items: center;
  height: 300px;
  background-color: #fffde7;
  border: 2px solid #60501b;
  border-radius: 20px;
  transition: background-color 2s ease-in-out;
}
.box p {
  color: #fff;
}
.box.changeBgColor {
  background-color: #60501b;
}
</style>
表示結果
画面幅501px以上の場合は、まだハイドレート開始前のため非同期コンポーネントの背景色の変更と文字の表示が反映されませんが、500px以下にするとハイドレートが開始されます。
Hydrate on Interaction
hydrateOnInteraction()を利用することで、非同期コンポーネントに指定したイベントが実行されたタイミングでハイドレートを開始させることができます。
hydrateOnInteraction()の使用例
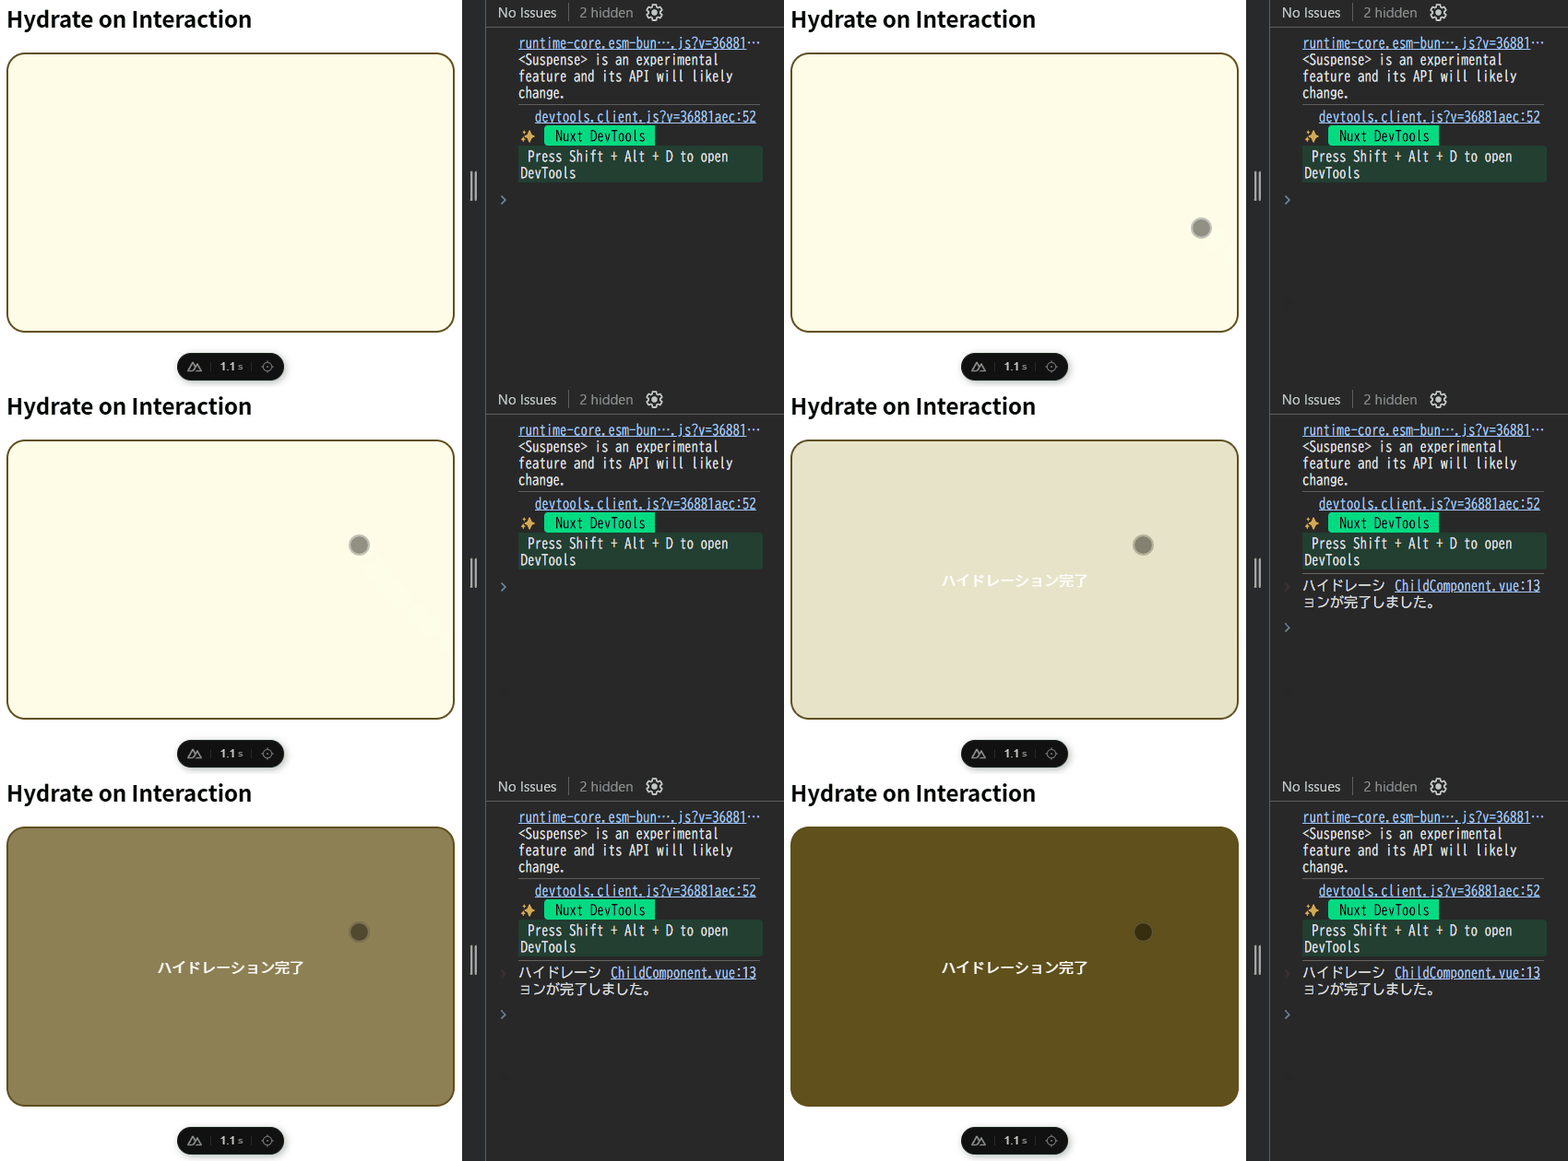
hydrateOnInteraction()の引数にイベント名を指定します。以下では、非同期コンポーネントをクリックするとハイドレートが開始されるように"click"を指定しています。
<template>
  <h2>Hydrate on Interaction</h2>
  <AsyncChildComponent />
</template>

<script setup lang="ts">
import { defineAsyncComponent, hydrateOnInteraction } from "vue";

const AsyncChildComponent = defineAsyncComponent({
  loader: () => import("./ChildComponent.vue"),
  hydrate: hydrateOnInteraction("click"),
});
</script>
<template>
<div class="box" :class="{ changeBgColor: hydration }">
<p v-if="hydration">ハイドレーション完了</p>
</div>
</template>
<script setup lang="ts">
import { ref, onMounted } from "vue";
const hydration= ref<boolean>(false);
onMounted(() => {
hydration.value = true;
console.log("ハイドレーションが完了しました。");
});
</script>
<style scoped>
.box {
display: flex;
justify-content: center;
align-items: center;
height: 300px;
background-color: #fffde7;
border: 2px solid #60501b;
border-radius: 20px;
transition: background-color 2s ease-in-out;
}
.box p {
color: #fff;
}
.box.changeBgColor {
background-color: #60501b;
}
</style>表示結果
非同期コンポーネント上でクリックするとハイドレートが開始されていることが分かります。
複数イベントの指定
また以下のように複数のイベントを指定することも可能です。例では、イベントをclickだけではなく、mouseoverも追加してみました。
hydrate: hydrateOnInteraction(["click", "mouseover"])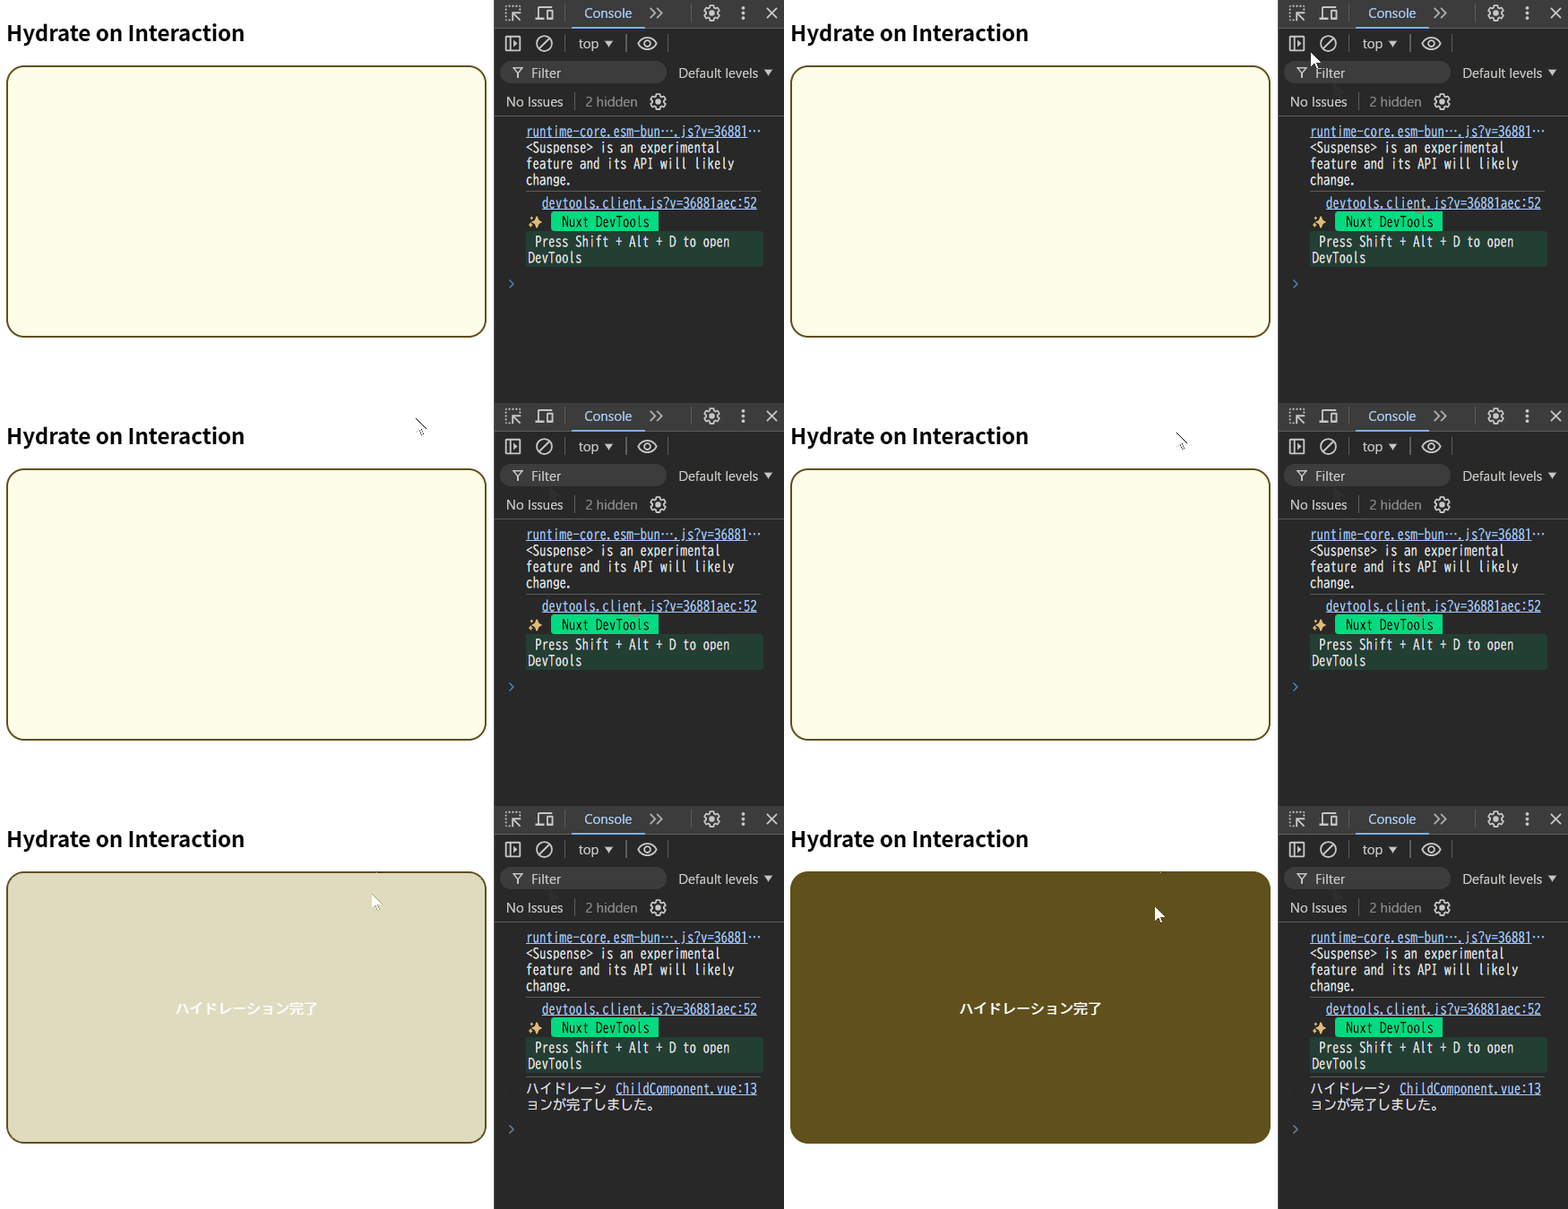
Custom Strategy
ハイドレート戦略を自分でカスタマイズすることも可能です。
Custom Strategyの使用例
以下の例では、customStrategy()という一定時間後にハイドレートを開始させる関数を作成しています。
<template>
  <h2>Custom Strategy</h2>
  <AsyncChildComponent />
</template>

<script setup lang="ts">
import { defineAsyncComponent, type HydrationStrategy } from "vue";

const customStrategy: HydrationStrategy = (hydrate) => {
  const duration:number = 5000
  const timerId = setTimeout(() => {
    hydrate();
    clearTimeout(timerId);
  }, duration);
  return () => clearTimeout(timerId);
};

const AsyncChildComponent = defineAsyncComponent({
  loader: () => import("./ChildComponent.vue"),
  hydrate: customStrategy,
});
</script>
<template>
<div class="box" :class="{ changeBgColor: hydration }">
<p v-if="hydration">ハイドレーション完了</p>
</div>
</template>
<script setup lang="ts">
import { ref, onMounted } from "vue";
const hydration= ref<boolean>(false);
onMounted(() => {
hydration.value = true;
console.log("ハイドレーションが完了しました。");
});
</script>
<style scoped>
.box {
display: flex;
justify-content: center;
align-items: center;
height: 300px;
background-color: #fffde7;
border: 2px solid #60501b;
border-radius: 20px;
transition: background-color 2s ease-in-out;
}
.box p {
color: #fff;
}
.box.changeBgColor {
background-color: #60501b;
}
</style>表示結果
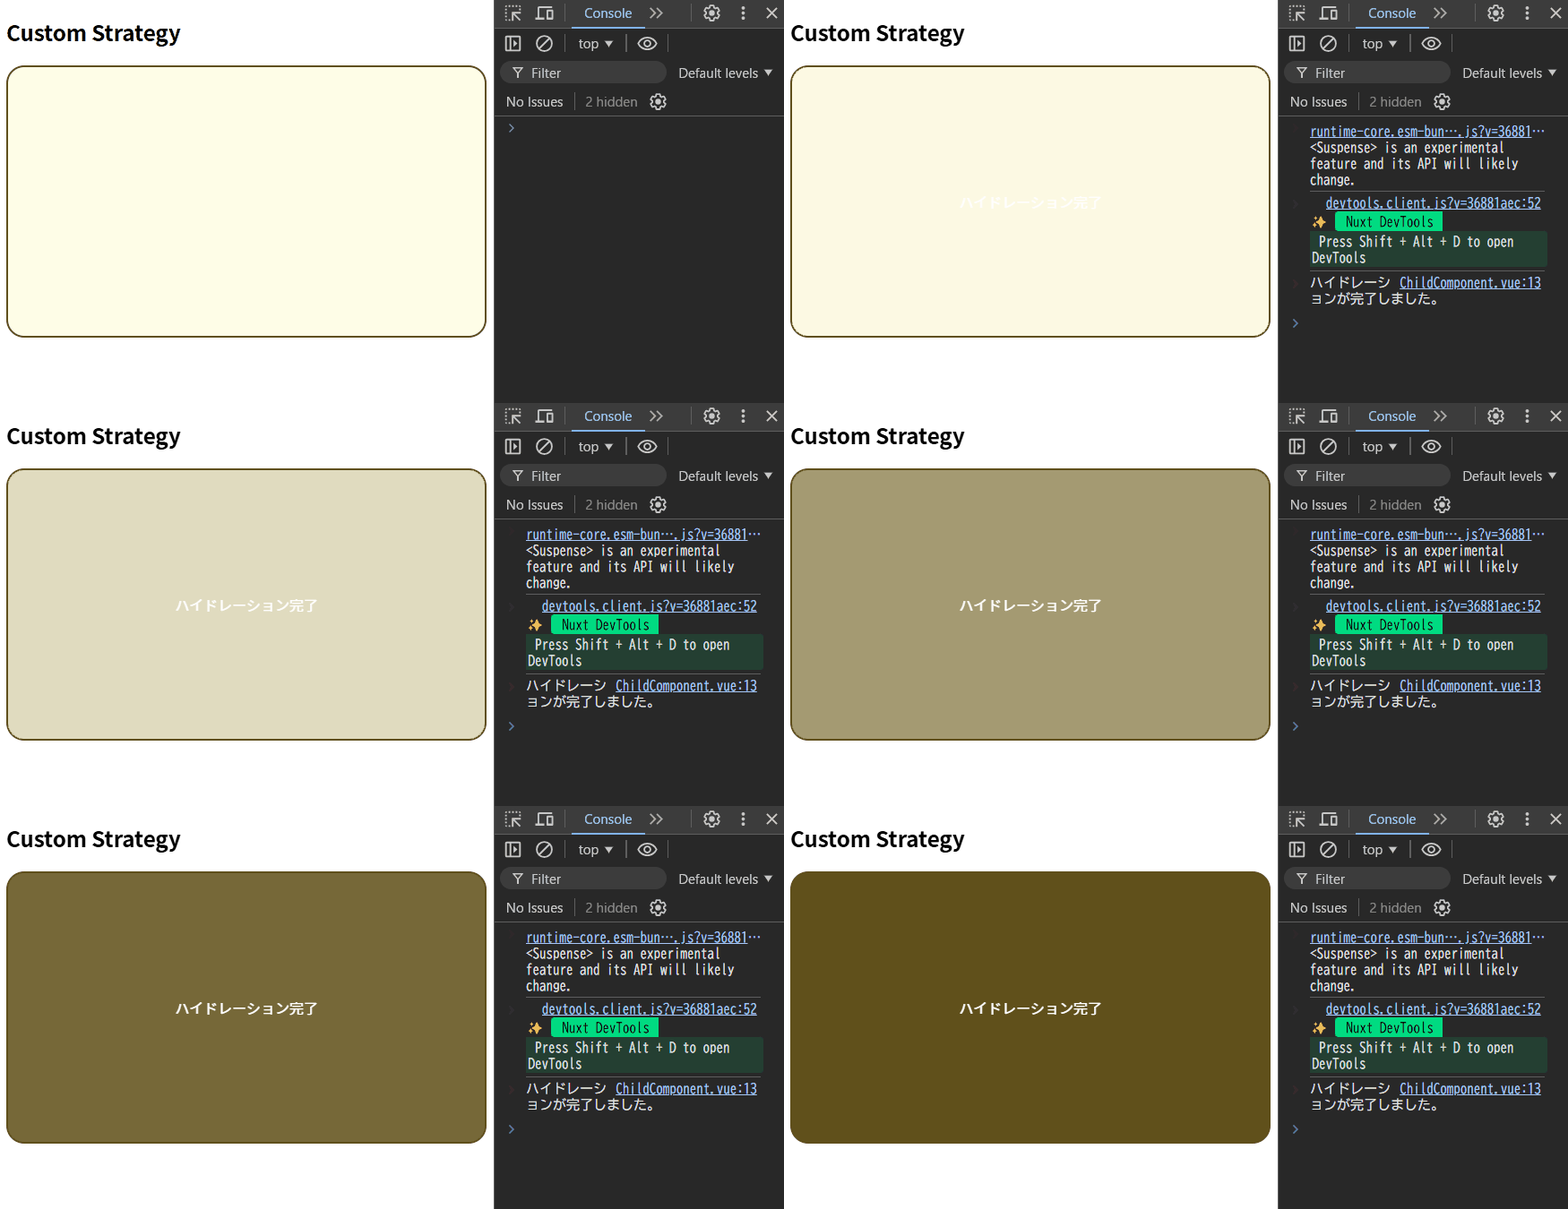
Custom Strategyは、すでに用意されているハイドレート戦略にはない条件を自分で作成することができるため、様々な場面でハイドレートの開始タイミングを制御させることが可能になります。
useId()
useId()
引用:The Vue Point - useId()
useId()is an API that can be used to generate unique-per-application IDs that are guaranteed to be stable across the server and client renders. They can be used to generate IDs for form elements and accessibility attributes, and can be used in SSR applications without leading to hydration mismatches:
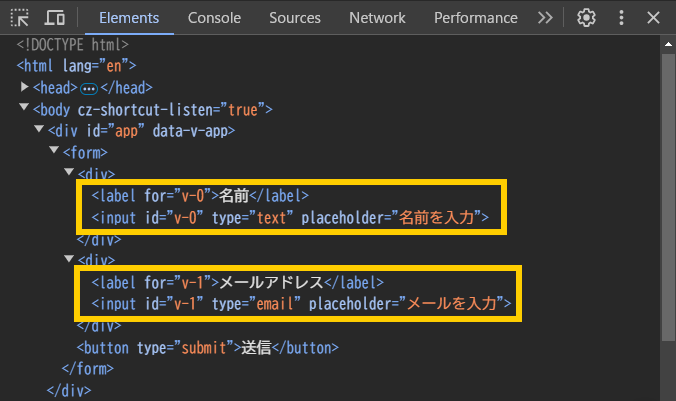
useId() は、サーバーサイドレンダリング(SSR)でサーバー側とクライアント側で生成されたIDが一致するように、ユニークなIDを生成します。

useId() は、ハイドレーションによるIDの不一致を防ぐ役割があります。useId()の使用例
<template>
  <form>
    <div>
      <label :for="nameId">名前</label>
      <input :id="nameId" type="text" placeholder="名前を入力" />
    </div>
    <div>
      <label :for="emailId">メールアドレス</label>
      <input :id="emailId" type="email" placeholder="メールを入力" />
    </div>
    <button type="submit">送信</button>
  </form>
</template>

<script setup lang="ts">
import { useId } from 'vue'

const nameId = useId()
const emailId = useId()
</script>検証ツールで生成されたIDを確認してみるとv-0、v-1のようなユニークなIDが生成されます。
app.config.idPrefix
main.tsにapp.config.idPrefixを追記することで、useId()で生成されたIDにプレフィックスを追加することができます。
app.config.idPrefix = 'add-prefix'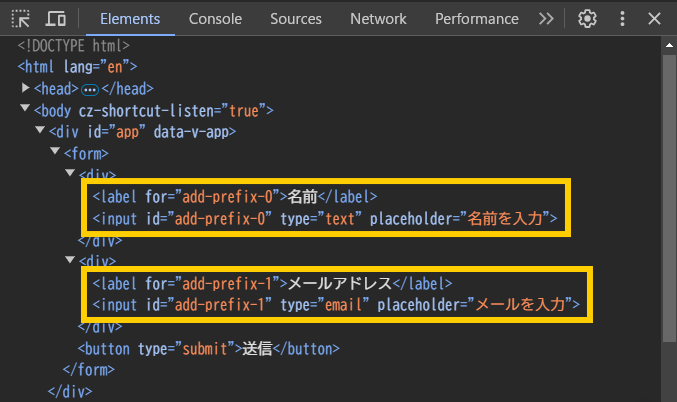
data-allow-mismatch
data-allow-mismatch
In cases where a client value will be inevitably different from its server counterpart (e.g. dates), we can now suppress the resulting hydration mismatch warnings with
引用:The Vue Point - data-allow-mismatchdata-allow-mismatchattributes:
data-allow-mismatchは、サーバーサイドレンダリング(SSR)のハイドレートによる不一致を許可する機能です。
data-allow-mismatchの使用例
data-allow-mismatchに属性値を指定することで、不一致を許可するタイプを指定することができます。
<template>
  <p data-allow-mismatch>{{ data }}</p>
</template>※属性値を使用せずdata-allow-mismatch単体で使用する場合は、すべてのタイプの不一致を許可します。
指定できる属性値
text:テキストコンテンツの不一致を許可children:直下の子要素に対してのみ不一致を許可class:クラスの不一致を許可style:スタイルの不一致を許可attribute:属性の不一致を許可
カスタム要素の改善
Custom Elements Improvements
3.5 fixes many long-standing issues related to the
defineCustomElement()API, and adds a number of new capabilities for authoring custom elements with Vue:引用:The Vue Point - Custom Elements Improvements
- Support app configurations for custom elements via the
configureAppoption.- Add
useHost(),useShadowRoot(), andthis.$hostAPIs for accessing the host element and shadow root of a custom element.- Support mounting custom elements without Shadow DOM by passing
shadowRoot: false.- Support providing a
nonceoption, which will be attached to<style>tags injected by custom elements.
Vue 3.5では、defineCustomElement()に関する新しい機能や改善が導入されています。
configureApp:カスタム要素に対して Vue アプリケーションインスタンスを設定することができるオプションです。useHost():カスタム要素のホスト要素を取得するためのComposition APIの関数です。useShadowRoot():カスタム要素のシャドウルートにアクセスするための関数です。this.$host:カスタム要素のホスト要素を取得するためのOptions APIの属性です。shadowRoot: false:カスタム要素を定義する際に、シャドウDOMを使用するかを指定できます。デフォルトはtrueです。nonce:カスタム要素が生成するシャドウルート内の<style>タグに、そのnonceが設定され、Content Security Policy (CSP) のルールに従って信頼されたスタイルとして扱われるようになります。
その他の新機能
useTemplateRef()
useTemplateRef()
3.5 introduces a new way of obtaining Template Refs via the
引用:The Vue Point - useTemplateRef()useTemplateRef()API:
useTemplateRef()は、ref属性が指定されたDOM要素を参照することができる機能です。
useTemplateRef()の使用例
ref属性の属性値に指定した文字列をuseTemplateRef()の引数に設定します。これにより、ref属性が指定されているテンプレート内のDOM要素を取得することができます。
<template>
  <div ref="changeBgColor">
    <p ref="changeTextColor">背景色と文字色を変更します。</p>
  </div>
</template>

<script setup lang="ts">
import { useTemplateRef, onMounted } from 'vue'

const elementRef1 = useTemplateRef<HTMLDivElement>('changeBgColor')
const elementRef2 = useTemplateRef<HTMLParagraphElement>('changeTextColor')

onMounted(() => {
  if (elementRef1.value && elementRef2.value) {
    elementRef1.value.style.backgroundColor = '#60501b'
    elementRef2.value.style.color = '#fff'
  }
})
</script>
バージョン3.5以前の場合
バージョン3.5以前は、ref属性に指定している値と同じ名前の変数を用意、初期値をnullとし、一度初期化をする必要がありました。
<template>
  <div ref="elementRef1">
    <p ref="elementRef2">背景色と文字色を変更します。</p>
  </div>
</template>

<script setup lang="ts">
import { ref, onMounted } from 'vue'

const elementRef1 = ref<HTMLDivElement | null>(null)
const elementRef2 = ref<HTMLParagraphElement | null>(null)

onMounted(() => {
  if (elementRef1.value && elementRef2.value) {
    elementRef1.value.style.backgroundColor = '#60501b'
    elementRef2.value.style.color = '#fff'
  }
})
</script>
useTemplateRef()とref()の比較
useTemplateRef()とref()を紹介しましたが、どちらも大して変わらないように見えます。
しかし、DOM要素の参照処理をcomposable関数として切り出すという観点でいくと、useTemplateRef()の方が使用しやすく、記述量もref()に比べて短縮させることができます。
ref()の場合
ref()でDOM要素の参照を行う場合は、ref属性の属性値と同じ変数名にしなくてはならないという制約があり、composable関数を使用する側で一度変数宣言を行う必要がありました。
<template>
  <p ref="elBgColorChange">背景色が変更します。</p>
</template>

<script setup lang="ts">
import { useBgColorChanger } from "@/assets/js/useBgColorChanger";
import { ref } from "vue";

/**
 * ref属性の属性値と同じ変数名を指定するという制約のもと、
 * composable関数を使用する側で変数宣言を行う
 */
const elBgColorChange = ref(null);
useBgColorChanger(elBgColorChange);
</script>
import { onMounted } from "vue";
export const useBgColorChanger = (elementRef: {
value: HTMLElement | null;
}) => {
const changeElementBackgroundColor = () => {
elementRef.value!.style.backgroundColor = "#444";
};
onMounted(() => {
if (elementRef.value) {
changeElementBackgroundColor();
}
});
};useTemplateRef()の場合
それに比べuseTemplateRef()は、引数にref属性の値を渡してあげるだけで済むので、composable関数内の記述に含めることができます。
<template>
  <p ref="elBgColorChange">背景色を変更します。</p>
</template>

<script setup lang="ts">
import { useBgColorChanger } from '@/assets/js/useBgColorChanger'

useBgColorChanger('elBgColorChange')
</script>
import { useTemplateRef, onMounted } from 'vue'
export const useBgColorChanger = (targetElementRef: string) => {
const elementRef = useTemplateRef<HTMLElement>(targetElementRef)
const changeElementBackgroundColor = () => {
elementRef.value!.style.backgroundColor = '#444'
}
onMounted(() => {
if (elementRef.value) {
changeElementBackgroundColor()
}
})
}Deferred Teleport
Deferred Teleport
A known constraint of the built-in
<Teleport>component is that its target element must exist at the time the teleport component is mounted. This prevented users from teleporting content to other elements rendered by Vue after the teleport.In 3.5, we have introduced a
引用:The Vue Point - Deferred Teleportdeferprop for<Teleport>which mounts it after the current render cycle, so this will now work:
バージョン3.5からは、Teleportコンポーネントでdefer属性を指定することができるようになりました。
defer属性を指定することで、テレポート先のDOM要素がレンダリングされるまでTeleportコンポーネントがマウントされるのを待機してくれます。
defer属性の使用例
バージョン3.5ではdefer属性が導入されたため、defer属性が指定されたTeleportコンポーネントは、指定したDOM要素がレンダリングされるまでTeleportコンポーネントはマウントされなくなります。
<template>
  <div id="box01"></div>
  <Teleport to="#box01">
    <p class="text">#box01にテキストが入ります。</p>
  </Teleport>

  <Teleport defer to="#box02">
    <p class="text">#box02にテキストが入ります。</p>
  </Teleport>
  <div id="box02"></div>
</template>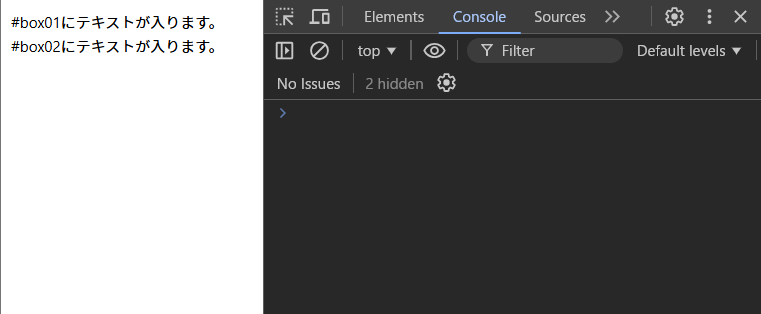
defer属性未使用の場合
例えば、#box01のdiv要素はTeleportコンポーネントがマウントされた時点で存在しているため、内容がテレポートされ正常に表示できていますが、#box02のセクション要素はTeleportコンポーネントがマウントされた時点ではまだDOMツリーに存在していないため正常にテレポートが行われず、その旨の警告文が表示されます。
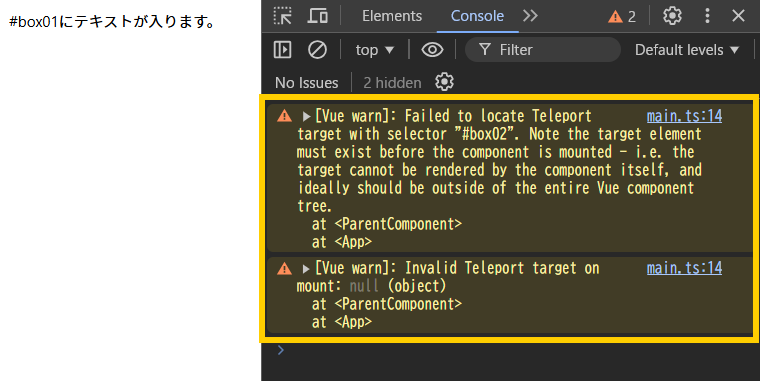
警告文
セレクタ 「#box02 」を持つテレポートターゲットの検索に失敗しました。つまり、ターゲットはコンポーネント自体によってレンダリングされることはなく、Vueのコンポーネントツリー全体の外側にあるのが理想的です。
[Vue warn]: Invalid Teleport target on mount: null
マウント上の無効なテレポートターゲット:NULL
onWatcherCleanup()
onWatcherCleanup()
3.5 introduces a globally imported API,
引用:The Vue Point - onWatcherCleanup()onWatcherCleanup(), for registering cleanup callbacks in watchers:
onWatcherCleanup()は、ウォッチャーが再実行される前にクリーンアップ関数を実行させることができる機能です。
onWatcherCleanup()の使用例
以下の使用例では、inputの値が変更されるたびにタイマーが実行されますが、実行前に以前のタイマーが削除されるようにonWatcherCleanup()内に処理を記述しています。
<template>
  <p>入力値変更でカウントアップ開始</p>
  <input type="number" v-model="inputNum" min="0" />
  <p>タイマー : {{ timerNum }}秒</p>
</template>

<script setup lang="ts">
import { ref, watch, onWatcherCleanup } from 'vue'

const duration: number = 1000
const inputNum= ref<number>(0)
const timerNum = ref<number>(inputNum.value)

watch(inputNum, newValue => {
  timerNum.value = newValue

  const timerId = setInterval(() => {
    if (timerNum.value >= 0) {
      timerNum.value++
    } else {
      clearInterval(timerId)
    }
  }, duration)

  onWatcherCleanup(() => {
    clearInterval(timerId)
  })
})
</script>
表示結果
onWatcherCleanup()により、inputの値が変更されるたびに過去のタイマーは削除されるため、正常にタイマーが動作していることが分かります。

onWatcherCleanup()未使用の場合
上記で解説したコードのonWatcherCleanup()がない場合はどのような挙動になるでしょうか。以下にonWatcherCleanup()を使用しない場合のコードを用意しました。
<template>
  <p>入力値変更でカウントアップ開始</p>
  <input type="number" v-model="inputNum" min="0" />
  <p>タイマー : {{ timerNum }}秒</p>
</template>

<script setup lang="ts">
import { ref, watch } from 'vue'

const duration: number = 1000
const inputNum= ref<number>(0)
const timerNum = ref<number>(inputNum.value)

watch(inputNum, newValue => {
  timerNum.value = newValue

  const timerId = setInterval(() => {
    if (timerNum.value >= 0) {
      timerNum.value++
    } else {
      clearInterval(timerId)
    }
  }, duration)
})
</script>
表示結果
inputの値を大きくするほどタイマーが異常な速さで加算されていきます。

原因は、watchが再実行されるたびsetIntervalが追加実行されます。そのためタイマーが実行されたsetInterval分タイマーが重複実行されるため、秒数の増加スピードがアップしています。
まとめ
最後までお読みいただきありがとうございました。
Vue 3.5は、Vueを用いた開発効率と品質向上に向けて多くの改善と新機能を提供してくれた素晴らしいアップデートだったと思います。
ぜひ本記事を参考に、Vue3.5のアップデート内容をVue開発に活用していただけますと幸いです。

